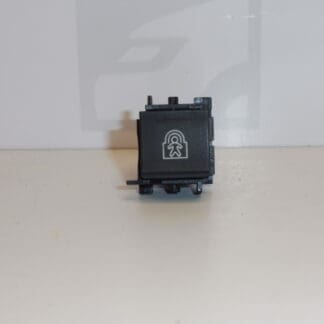
Description
Part Description
Used Citroën Peugeot 98177358ZD control switch from the category of electrical controls and switches. It is a suitable choice when looking for a replacement part based on the markings on the original part. The reference materials also list the number 9817735877.
The part is listed for the Citroën Berlingo K9, FIAT DOBLO III, OPEL COMBO E K9, PEUGEOT RIFTER and Toyota ProAce City models. The specific controlled function and equipment variant are not specified, so when selecting a part, compare the product number, control switch design, connector and mounting with the original part. The model name alone may not be enough to identify the correct version.
Technical Information
- Manufacturer: not specified; the reference materials list the designation Stellantis CITROEN PEUGEOT.
- Model: Citroën Berlingo K9 | FIAT DOBLO III | OPEL COMBO E K9 | PEUGEOT RIFTER | Toyota ProAce City.
- Part type: electrical control switch; category: Other controls and switches.
- Condition: used part.
- Main product number: 98177358ZD.
- Additional numbers: 9817735877.
- Specific function, location and connector design: not specified.
Product Codes
- Product codes: 98177358ZD, 9817735877.
When looking for a replacement, compare these markings with the number on the original control switch. The fact that both numbers are listed in the reference materials does not in itself confirm that all variants are interchangeable.
Installation Recommendations
The following procedure is a general guide to replacing an electrical control switch. The exact steps, access to the part and any subsequent settings depend on the specific model and vehicle configuration. The reference materials do not include installation instructions for this part.
1) Before installation
- Compare the markings on the original and replacement parts, the shape of the housing, controls, mounting and connector, including its mechanical keying.
- Inspect the used part, especially for cracks, damaged clips, loose parts, the condition of the contacts and any signs of moisture or overheating.
- Check whether the fault could be in the wiring, connector or power supply. Replacing the control switch will not resolve such a fault.
2) Tools and materials required
- Hand tools suitable for the vehicle’s actual fasteners.
- Plastic trim removal tools, if surrounding trim needs to be released.
- A flashlight, clean cloth and, if needed, a product suitable for electrical contacts and the surrounding materials.
- A multimeter or diagnostic equipment, as needed, to verify an electrical fault.
3) Step-by-step installation procedure
- Park the vehicle safely, secure it against movement, and switch off the ignition and electrical accessories.
- Follow the manufacturer’s service procedure to allow the electronics to enter sleep mode, and disconnect the battery as specified before disconnecting any electrical connections.
- Document the original position of the control switch and the cable routing, for example by taking a photo.
- If access requires removing a cover or trim panel, carefully release its fasteners. Do not apply force when prying at locations where the clips are not known.
- Release the original control switch’s fasteners and access the connector without pulling on the wires.
- Release the connector lock and disconnect it by pulling on its housing, not on the wires.
- Inspect the contacts and wiring. Address any corrosion, looseness or heat damage before connecting the replacement part.
- Compare the two control switches again. Connect the matching connector without forcing it, and check that its lock is properly engaged.
- Secure the control switch in its original manner, route the wiring without pinching it, and reinstall any covers or trim panels that were removed.
- Reconnect the battery according to the manufacturer’s instructions and perform any required function resets following its disconnection.
4) Post-installation checks and function verification
First, test all functions of the relevant control switch while the vehicle is stationary. Check that the controls operate smoothly, are firmly seated and that the controlled system responds correctly. If a function needs to be verified while driving, take a short, safe test drive only after successfully completing the stationary checks. Stop the test if you notice unusual behavior, an odor or heating.
5) Common installation mistakes and how to avoid them
- Choosing by appearance alone: also compare the numbers, connector and mounting.
- Breaking the clips: first determine how they are secured and do not use excessive force.
- Connector not fully engaged or wires pinched: check that the connector is locked and the wiring is routed correctly before closing the trim.
- Overlooking an electrical circuit fault: if problems persist, check the power supply, connections and related system instead of repeatedly replacing the control switch.
Reasons for Part Damage
Common causes of damage to electrical controls and switches in general include:
- Mechanical wear of the controls and internal contacts due to frequent use.
- Ingress of moisture, spilled liquids or dirt, which can interfere with contact and mechanism movement.
- Excessive force during operation or careless removal, causing the housing or mounts to crack.
- Loose or corroded electrical connections, which can cause interruptions and overheating.
- Wiring or power supply faults, which can affect operation or damage the electrical components of the control switch.
These are general causes for this type of part, not a description of the condition of the item offered.