Description
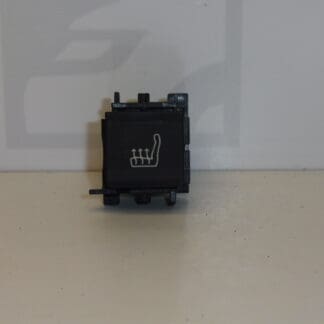
Seat heating control for CITROEN, PEUGEOT and other Stellantis models
Part description
The used seat heating control is designed to operate the seat heating and can serve as a replacement for a damaged or non-functioning control. The identifiers 98205618ZD and 9820561877 are essential when looking for a replacement part. Before selecting a part, compare the original part number, control design, connector and mounting.
The source information lists the Citroën Berlingo K9, FIAT DOBLO III, OPEL COMBO E K9, PEUGEOT RIFTER and Toyota ProAce City models. However, the model name alone does not guarantee compatibility with all equipment variants. Replacing the control makes sense especially if diagnostics or an electrical circuit inspection have identified this component as the cause of the fault.
Technical information
- Manufacturer: not specified; Stellantis / CITROEN / PEUGEOT is listed in the source information.
- Model: Citroën Berlingo K9; FIAT DOBLO III; OPEL COMBO E K9; PEUGEOT RIFTER; Toyota ProAce City.
- Part type: seat heating control.
- Condition: used part.
- Category: Electrical components – Other – Other controls and switches.
- Additional numbers: not specified.
- Specific location and connector design: not specified.
Product codes
- Product codes: 98205618ZD, 9820561877.
Both identifiers are listed in the source information for this product. When comparing it with the old control, take the complete identifier, including the ending characters, into account—not just the numeric base.
Installation recommendations
The following general procedure applies to this type of electrical control. The exact access to the part, method for releasing covers and power disconnection requirements depend on the specific model and vehicle configuration. Follow the manufacturer’s service procedure.
1) Before installation
- Compare the identifiers on the old and replacement parts, the shape of the control surface, connector, contacts and mounting points.
- Inspect the used control for cracks, broken clips, bent contacts, signs of moisture or overheating.
- Inspect the connector and wiring in the vehicle. The seat heating may not be working because of the control; the cause could also be the power supply, wiring or another part of the system.
2) Tools and materials required
- Plastic tools for removing interior trim panels.
- Standard hand tools suitable for the fasteners actually used.
- A flashlight and a clean cloth; suitable electrical contact cleaner if needed.
- A suitable measuring instrument and wiring diagram for the specific vehicle to locate an electrical fault.
3) Step-by-step installation procedure
- Secure the vehicle against movement, switch off the ignition and electrical accessories.
- Following the manufacturer’s instructions, allow the electrical systems to enter their rest state and disconnect the power supply using the prescribed procedure.
- Protect nearby visible surfaces from scratches and determine how to remove the covers blocking access to the control.
- Carefully release the necessary covers using suitable tools. If you encounter resistance, first check for a concealed fastener.
- Before removal, note the orientation of the control and the routing of the wiring, for example by taking a photograph.
- Release the control’s mounting and access the connector without pulling on the wires.
- Release the connector lock and disconnect it by holding its housing. Do not pull on the wires.
- Compare the two controls side by side and inspect the connection. Resolve any damage found on the connector or wiring before continuing.
- Connect the replacement control, make sure the connector is properly locked and fit the part into its mount without using excessive force.
- Route the wiring so that it is not stretched or pinched, and reinstall the removed covers and fasteners.
- Restore the power supply according to the manufacturer’s procedure and check that the control and seat heating work.
4) Post-installation checks and function verification
- Check that the control is securely fitted, the controls move freely and the surrounding covers sit correctly.
- Under the operating conditions specified by the manufacturer, test switching the heating on and off and the available heating control settings. If the specific configuration includes an indicator, check that it works as well.
- Verify that the seat heating actually responds, not just the control. If you notice an odor, smoke or unusual heating of the control, switch the system off immediately.
- Function can generally be checked while the vehicle is stationary. If a test drive is required, make adjustments before setting off and do not carry out diagnostics while driving.
5) Common installation mistakes and how to avoid them
- Choosing based on appearance alone: also compare the complete identifier, connector and mounting.
- Replacing without verifying the cause of the fault: first check the associated electrical circuit.
- Forcing trim panels off: locate the fasteners and use plastic removal tools.
- Connector not fully seated or wiring pinched: check the connector lock and wire routing before closing the covers.
- Working with the power supply connected: follow the prescribed procedure for safely disconnecting the electrical system.
Reasons why the part may become damaged
The following are common potential causes of damage to seat heating controls. They do not describe the condition found on this particular item.
- Mechanical wear from repeated use or pressing the control too hard.
- Ingress of liquids and dirt, which can impair the mechanism or damage the electrical contacts.
- Oxidation or poor contact in the connector, causing intermittent operation and possible localized overheating of the connection.
- Careless removal, which can damage the clips, control housing or contacts.
- A fault in the associated electrical system, which can affect the control’s operation; therefore, it is important to determine the actual cause of the problem before replacement.