Description
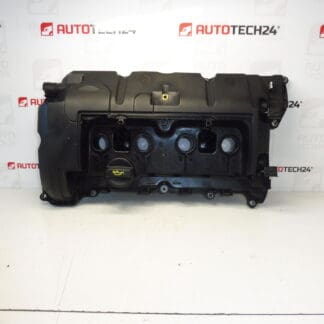
Cylinder head cover 1.4 VTI 1.6 VTI for Citroën and Peugeot cars
Part description
This valve cover / cylinder head cover is a used original part designed for 1.4 VTI and 1.6 VTI engines in Citroën and Peugeot cars. It is an important part of the engine that closes the upper part of the cylinder head and helps protect the internal parts of the distribution system from dirt and leakage of operating fluids.
The part is often searched for by the manufacturer’s designation, which is why we also include the number 0248Q5. For auto mechanics and home repairs, it is important to compare not only the shape of the part itself, but also all connection points, ventilation and the design of the sealing surfaces according to the original piece.
Technical information
- Manufacturer: Stellantis Citroën Peugeot
- Model: Citroën Berlingo B9, Citroën C3 II, Citroën C3 Picasso, Citroen C4 II, Citroën C4 Picasso II, Peugeot 207, Peugeot 308, Peugeot Partner Tepee
- Other numbers: 0248Q5
Product codes
- Product codes: 0248Q5
- Model names: Citroën Berlingo B9, Citroën C3 II, Citroën C3 Picasso, Citroen C4 II, Citroën C4 Picasso II, Peugeot 207, Peugeot 308, Peugeot Partner Tepee
Installation recommendations
In general, for valve cover / cylinder head cover replacement, the exact procedure may vary depending on the specific engine and car design. Below is a safe and practical general procedure for this type of part.
1) Before assembly
- Check that the used lid matches the old part in shape, fit, hose connections and location of all holes.
- Carefully inspect the sealing surfaces for cracks, deformation or excessive damage.
- Check the condition of the threads, seating points and any integrated parts if they are part of the lid.
- Compare the part number 0248Q5 with the originally disassembled piece.
- Before assembly, clean the bearing surfaces on the engine and on the part itself from old dirt and gasket residues.
2) Necessary tools and materials
- A common set of hand tools
- Detergent suitable for degreasing
- Clean lint-free cloths
- Suitable lighting of the work area
- A new gasket if the design of the part requires it and the original one is not usable
3) Step-by-step assembly procedure
- Disconnect the battery if the vehicle design or scope of work requires it.
- Remove obstructing covers and accessories that prevent access to the lid.
- Disconnect any hoses, connectors, or other parts attached to the original lid, if present.
- Gradually loosen the fasteners of the old lid so as not to twist or damage it.
- Remove the original cover and check the condition of the bearing surface on the engine.
- Thoroughly clean the contact surfaces and remove the remains of the old seal or deposits.
- Compare the old and new part side-by-side, especially dimensions, holes and accessory routing.
- Place the used lid correctly in place without force and check that you do not pinch the gasket or attached parts anywhere.
- Install the fasteners and tighten them gradually and evenly.
- Reconnect all disconnected hoses, connectors and other components.
- Put back the covers and other removed parts.
- Do a visual check that everything is properly seated and nothing is left loose.
-
4) Post-assembly checks and test drive / function verification
- After starting, check whether there are no leaks of operating fluids around the lid.
- Listen for unusual noises after assembly caused by improperly seated covers or accessories.
- After a short test drive, perform a visual leak check again.
- Check that all connected hoses and connectors are firmly in place.
5) The most common assembly mistakes + how to avoid them
- Insufficient cleaning of the bearing surface – leads to leakage; always clean and degrease the surfaces carefully.
- Exchanging a part with a similar design – always compare the shape, holes and part number before assembly.
- Seal damage during seating – seat the lid straight and without force.
- Uneven tightening – tighten the fastening points gradually and evenly.
- Forgot to connect hoses or connectors – after completing the assembly, perform a final check of all connected parts.
Reasons why the part is damaged
- Age and thermal stress – long-term exposure to high temperatures can cause deformation or embrittlement of the material.
- Sealing surface leakage – a worn or improperly seated seal can lead to leaks and subsequent damage.
- Mechanical damage during disassembly or assembly – careless handling can cause cracks or damage to the attachment.
- Excessive tightening of fasteners – can lead to deformation of the lid or damage to the seating areas.
- Fouling and operational dirt – deposits and dirt can worsen the tightness and overall condition of the part.